If you're switching your HDD (Hard Disk Drive) to an SSD (Solid State Drive), you may be wondering whether or not you have to reinstall Windows 10 all over again. Reinstall means you have to get started from scratch, such as creating bootable Windows 10 USB, installing drivers and the programs. This could take hours to complete. Thankfully, that's not the case at here. There are several amazing tools out there that are able to clone the entire drive to make migration much simpler than ever before. As such, you will only need the right tool in order to make the switch from HDD to SSD without reinstalling Windows.
First, why make the switch in the first place? SSDs have several advantages over traditional HDDs. To begin with, solid state drives are generally faster than hard disk drives because the time taken by the controller or "brain" of the SSD to store, retrieve, cache and clean information is much shorter. SSDs also have a very long lifespan, and it's quite possible that your solid state drive will even outlive you! Of course, SSDs are still more expensive per GB than HDDs, but the advantages usually outweigh the cons. Now let's move on to how to migrate your Windows 10 copy from an HDD to an SSD.
Tutorial: How to Move Windows 10 from HDD to New SSD without Reinstall
For this, you will need a disk cloning software, many of which are available for free. In this post, we will use MiniTool Partition Wizard to move Windows 10 to new SSD. You will also need to make sure that your SSD's capacity is greater than system partition of the old HDD.
Step 1: Download and install MiniTool Partition Wizard on the target computer. If you're switching drives, this will be the same as the source computer. It's only the drives that will be treated as source and destination.
Step 2: Launch the MiniTool application. In the left panel of the main window, you'll see an option called Migrate OS to SSD/HDD under the Wizard menu. In the main panel, you'll see all of your drives listed. Disk 1 will be your current hard drive, and Disk 2 is the new SSD that you are migrating to.
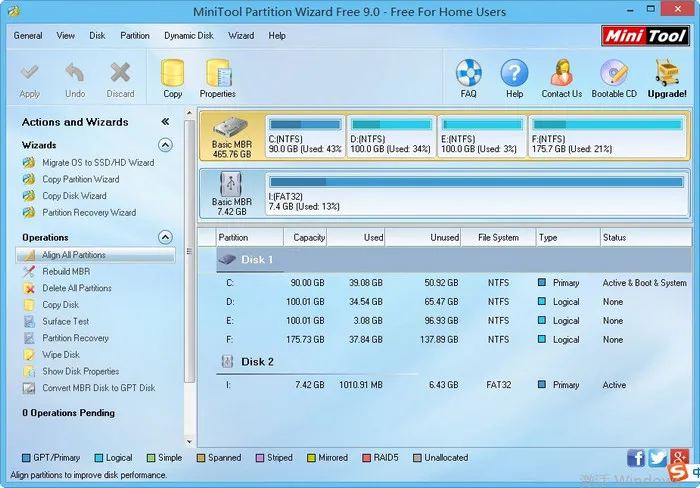
Step 3: Click on Migrate OS to SSD/HDD, and a new window will appear showing two migration mode options. The first is to replace the new disk with the old one, and the second is to migrate the operating system to the SSD while retaining the hard drive. If you think you'll need a lot of space moving forward, the second option is the one to choose. Click Next after you've enabled the correct radio button.
Step 4: Now you can choose the target or destination disk, which is Disk 2 (SSD), and then select the Copy Options as shown in this screenshot:

Step 5: At this point, you can define the sizes of your partitions by clicking on that partition in the Target Disk Layout section and then tweaking the size in the Change Selected Partition section right below it.
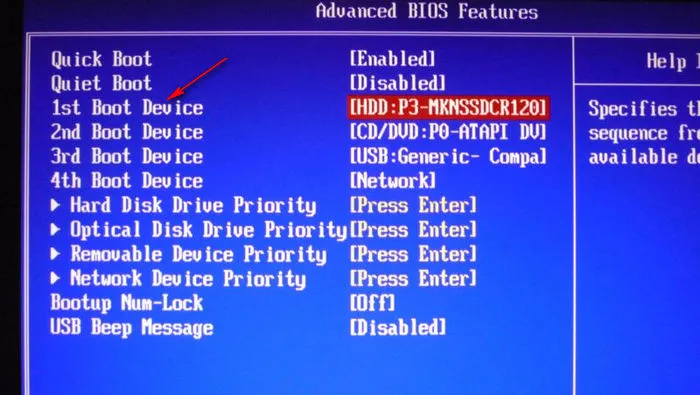
Step 6: Click on Next, after which you will be shown a warning to change your BIOS boot order. This has already been explained above. Click on Finish in that window.
Step 7: At a final step, click the Apply (tick mark icon) in the software's main toolbar and click on Yes to allow changes.
Important:
The last thing to be done is to set the SSD as first boot device in BIOS. For this, restart your PC and hit the F2 button to go to the BIOS Setup Utility. It might be a different button like Del or Esc depending on your PC's brand. Inside the setup utility, change the boot order to point to the SSD instead of the HDD. Save your changes and exit, and allow the boot to resume. Your computer will now boot from the OS copy stored on the solid state drive instead of old hard disk drive.
Following the steps above will migrate HDD to the new SSD including the operating system, or just the operating system alone, depending on which option you selected in Step 3 above. The process flow after both selections is similar, and you have now migrated your Windows 10 from the HDD to the SSD without losing any data on your source disk. This disk can now be your clone, acting as a backup if you ever need to roll back to the current status. For now, all your data in the source HDD will still be there, and you can now remove it or continue using it as you wish, depending on what option you choose.