Since it was first released in 2011, Rufus has been a very popular tool for creating Windows installers on USB. It lets users format USB flash drives and burn Windows 10 ISO files to USB in order to create a bootable media, which can then be used to install Windows 10 and older versions of the OS, until Windows 7. One major advantage is that you can even run Rufus off a USB stick if you download the portable version. The full version in an installable one, but both offer the same interface and functionality so it's really easy to switch between the two versions.
If you're already familiar with Rufus, you'll know that it is one of the most lightweight utilities of its kind. But don't let the 1MB size fool you: it's a powerful tool that Windows users have been using for nearly a decade now. In this article, we'll show you how to use Rufus to install Windows 10 on a computer. Specifically, we show you how to use Rufus to format the USB to the newer UEFI boot scheme rather than the legacy BIOS. UEFI is usually better because it offers more security features, and BIOS is expected to be phased out by Intel in 2020. However, on machines that only support BIOS, you won't be able to use UEFI.
Where to Download Rufus Install .exe
Rufus has been evolving constantly over the years and have a lot of version available for download. The latest version is 3.6 Beta released on July 8, 2019. Basically, a newer version is always preferred because new features are introduced and bugs being fixed. However, this is not the case for old computers, which runs on systems that out of date. You can find all stable and beta release at here: rufus.ie/downloads. This is the official source for downloading Rufus.

Another way to download Rufus is through file download sites like CNET, Softpedia, Filehippo. or MajorGeekers, which has faster downlaoding speed due to the content delivery network across the countries. According to online user feedback, the download link from Rufus website might be broken or get damaged so you have to use download site in such cases.
How to Use Rufus to Burn Windows 10 ISO to USB (Bootable)
Step 1: Download a copy of the latest version of Rufus and install it on PC.
Step 2: Get the Windows 10 ISO file from Microsoft's servers. Since you're on a Windows PC, you'll need to download the Media Creation Tool before getting access to the ISO file. When you see the Windows Setup screen, choose the option that says, "Create installation media (USB flash drive, DVD, or ISO file) for another PC." After selecting language, edition and architecture, you'll see a page asking you which media to use. Choose "ISO File" instead of "USB Flash Drive." This can be confusing to some users because you're trying to create a bootable USB drive!
Step 3: Launch Rufus and insert the USB drive into the computer.
Step 4: In the Rufus interface, first select your USB drive under Device. Next, choose your ISO file under Boot selection. Under Image Option, select Standard Windows Installation. The other option is to use Windows To Go, which allows you to install a full version of Windows on USB, but here we're doing a regular installation on a PC.
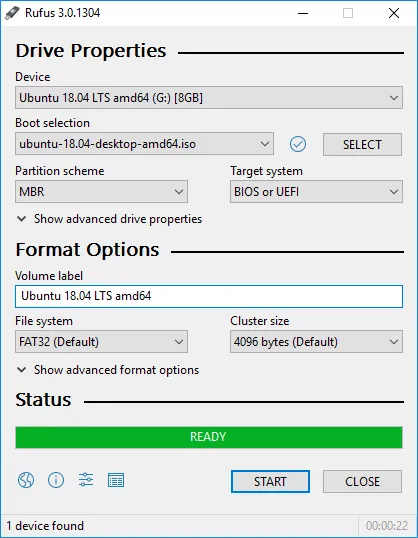
Step 5: Under Partition Scheme, select GPT if this installation is exclusively going to use UEFI, MBR for BIOS-only and Dual (UEFI+BIOS.) For this exercise, choose GPT and Target System as UEFI (non CSM.) File System needs to be NTFS if you're installing 64-bit Windows 10. Volume Label will automatically be extracted and displayed by Rufus from the ISO file, but you can change it to whatever you want.
>Step 6: The above is for the setup. All that's left to do is click on Start, and your USB installer will be ready in a few moments. Eject and remove it after the process is complete.
Install Windows 10 on New PC or Hard Drive
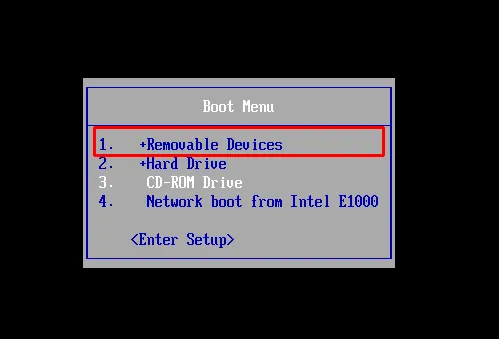
This part is quite straightforward but doesn't actually involve Rufus. You simply need to boot up the target PC from the USB installation drive you just created with Rufus. To do this, insert the drive and start up the computer. During boot-up, you'll need to hit F2 or some other special key to get to the boot menu. This depends on your brand of PC, but you'll see the key during the boot process. Pressing it will take you to the UEFI boot menu, where you need to change the boot order. This will allow your computer to boot from the USB drive instead of the OS installation on the local drive.
When your system resumes boot, you'll see the Windows Setup screen. From here, just follow the instructions to install Windows 10 on that PC. Of course, there are a lot of other, even better tools you can use to create the Windows 10 USB installer in the first place, but Rufus is a free and reliable tool used by a lot of Windows and Linux users.
What's to Do If Rufus Does Not Work?
Rufus is the first choice for most people for burning ISO to USB. You will find a lot of editors and bloggers recommend Rufus when searching in Google because it is so excellent. However, it is not perfect and a few user reported that Rufus does not work on certain old PCs as well as old Windows version. As an additional part to Rufus tutorial, it is highly advised to suggest an alternative if Rufus Failed.
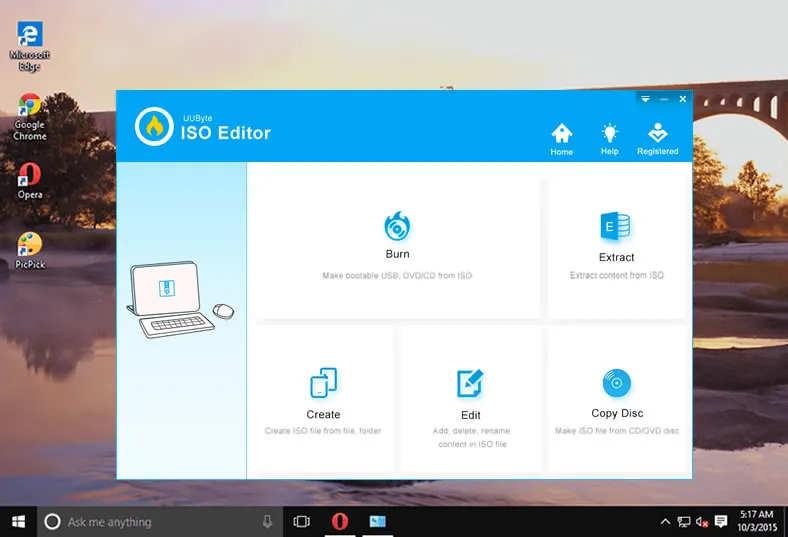
In our recommendation list, UUByte ISO Editor seems the best alternative to Rufus if you wished to burn Windows ISO to DVD or USB pen drive. Unlike Rufus, the setting part is much simple and the program does all the complex things in default so user don't need to touch the specific settings he or she is not aware of. In addition, it also supports all versions of Windows OS as well as USB brands including USB 2.0.


Step 1: Download a copy of UUByte ISO Editor and install it on a PC or Mac. You will see the following interface when opening it at first time.
Step 2: Insert an USB flash drive into the same computer and click "Burn" tab on the main interface. You will be lead to a new Window for ISO burning. Add Windows ISO file to the program and select the USB device name.
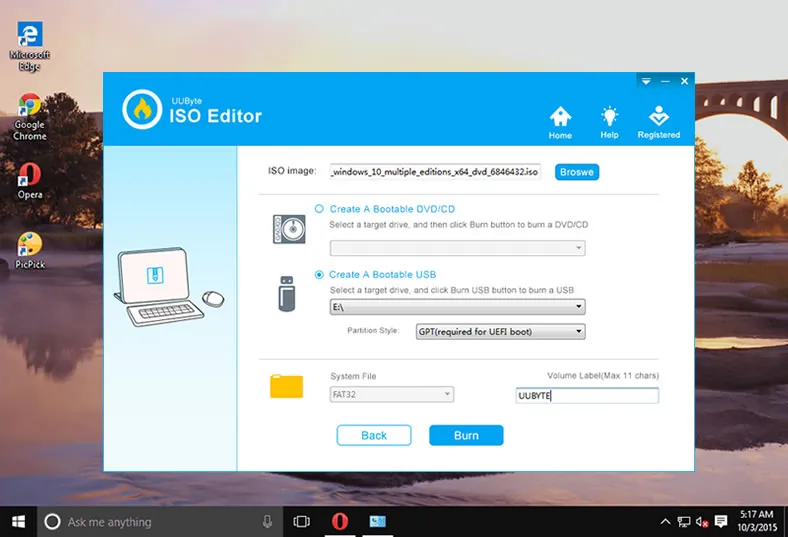
Step 3 : Click "Burn" button to start putting Windows ISO to USB. At this step , you should wait 10-15 minutes before the burning process is finished. Make sure the computer not going into sleep mode during thiss time.
Conclusion:
This is the complete guide on how to use Rufus to burn ISO to USB. Currently, Rufus supports ISO file from major OS, including Windows, Linux and Unix. It is the first choice in 2019 for ISO burning. Even it doesn't work, you still have the correct alternative to replace Rufus in order to create a bootable device.